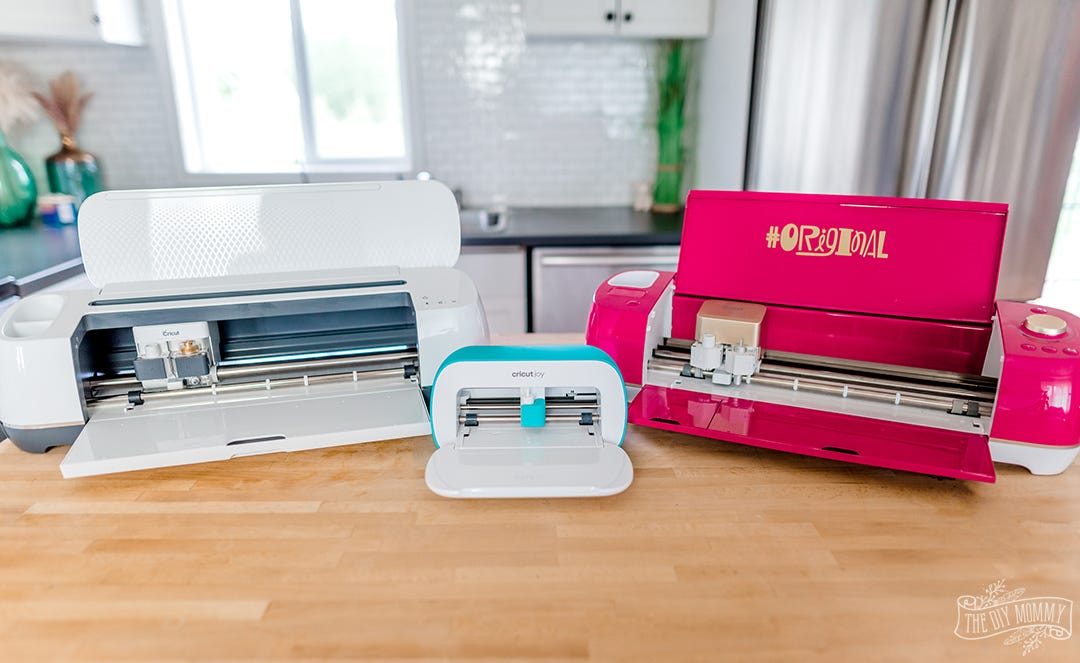
Your craft skills with the Cricut machine can be unlocked by visiting Cricut.com/setup. For those who are unfamiliar, a Cricut machine is an electronic cutting tool that lets you to make crafts out of a variety of materials. It can cut vinyl, fabric, paper, and some of its machines can even cut leather, cork, and wood when it comes to cutting materials. The tool has a "Rotary Blade" that can cut through materials including wood and linen. It provides us a basic understanding of what a remarkable invention it is.
You are familiar with
the Cricut machine so far. However, the Cricut accessories are unlimited, and
you might not get what a BrightPad is. This blog post is to tell you everything
about a Cricut BrightPad. This product is a lightweight and portable accessory
that helps with weeding, tracing, and many craft projects by adding extra light
when you need it. However, you can use BrightPad without a Cricut machine too. BrightPad
is a partner to all the cutting machines. It's just for lighting your project
when you need it.
Hence, we will explore
everything about Cricut BrightPad, like what it is and how you can use it
effectively. If you are a Cricut lover, you must buy this accessory to add
details to your crafts.
What Is A Cricut BrightPad?
It is a crafting tool
that helps add a backlit light source to your project. It can help you in many
detail-oriented projects. You can carry this accessory easily anywhere as it's
extremely portable.
Here are the basic features of BrightPad:
●Luminous Uniform LED light.
●It consists of 3 brightness settings.
●Lightweight, durable, and extremely portable
●Lit area: 9" X 11.5"
●Non-slippery base
●6 ft power cord
●Scratch-resistant polycarbonate surface
How Does Cricut BrightPad
Work?
The BrightPad is a light
portable box-style tool to add light to a project, either from behind or under
a project. The tool is simple, and there are no extra settings other than
choosing the intensity of brightness you need. You must plug it into a power
socket and charge the battery. It is so easy to see the detailed parts in the
craft, and you can easily weed the extra material you can't see in normal
lightning.
How To Use Cricut BrightPad?
To work with the BrightPad, you should follow the given
steps:
●Place it on the worktable and power it on.
●Then, adjust the light according to your
preference.
●Now, place your project over BrightPad, allowing
it to make your project shine.
In weeding, adjust the
light until the cut lines are visible in your material. Similarly, place the
design that you want to trace for tracing and then place the other material
over this. With the BrightPad, your original design is visible under your blank
paper. And then trace the way you want.
What Can You Make With Cricut
BrightPad?
The tool is perfect for
projects that need extra light from behind or under the project. For instance,
weeding and tracing are two project types that demand added light. For tracing,
you can place a light behind a design, making the project easy to see on the
top paper. Hence, you can trace it well. Whereas, in weeding, a backlit light
source helps to brighten the cut lines thoroughly. Also, the tool assists you
in lighting up the project when you're working on a multiple-layered project.
Things you can make with BrightPad:
●Color intricate designs
●Multi-layered projects
●You can work on paper crafts in dim light areas.
●Hand lettering without printing new sheets.
Why Should You Buy Cricut BrightPad?
The BrightPad is an
excellent accessory included in Cricut's lineup. It assists you through many
projects while weeding, tracing, and doing a couple of other things that need
lightning. This accessory is turned on by connecting it to a power source,
which works great with all kinds of projects. Hence, if you need a lightbox for
your amazing craft projects, we recommend the Cricut BrightPad.
The accessory is a
lightweight and extremely portable lightbox with an area of 11.5 by 9 inches.
Also, you get the USB charger and wall adapter with the BrightPad. Plus, its
nonslip base prevents unwanted slides on the work surface or a smooth surface.
The product is made of a hard, scratch-resistant polycarbonate surface.
Conclusion
Cricut BrightPad is
another product in Cricut's accessory lineup. It's a lightweight, portable
lightbox with a USB cable and wall adapter. It works brilliantly with your
craft projects by providing them with appropriate lighting. You can place them
under or behind your project to get the expected results.
You can use it with any
Cricut machine like Cricut joy, a Cricut maker, and Cricut Explore and take
advantage of its highly luminous surface and nonslip base. It can be your best
companion while weeding, tracing, or doing multi-layered projects. Use it now
for creating intricate designs.
FAQs
How Is Cricut BrightPad
Different From BrightPad Go?
BrightPad Go is the
updated version of BrightPad. It shows the main upgrade on its design. It is
cordless and has 5 adjustable brightness settings options, limited to 3 options
in the previous version. Hence, it is more flexible than BrightPad.
Do You Need To Plug In Your BrightPad?
Yes, you have to plug it
into a power source to work. It doesn’t include a battery or a wall adaptor.
You can use a PC's USB port or a regular USB wall adapter.
Can I Cut On The BrightPad?
Yes, you can. You need to go to project canvas
and follow the displayed instructions to cut your project. Cutting can be done
on BrightPad. Plus, you can adjust the lighting until the cut lines are seen.
How to clean Cricut
mat? This is one of the most asked questions of new users who started doing
projects with the Cricut machine. This blog will teach you everything you need
to make your Cricut mat clean and sticky.
Before starting the
cleaning process, let's discuss the materials, tools, and other things that
will help you clean the Cricut mat. In the next section, we have listed
important tools and materials required while following the Cricut mat cleaning
process.
Materials & Tools Required to Clean a Cricut Mat
Here are a few of
the most important items you can utilize to get shocking results. These
materials are not too costly and also easy to use. And also, remember that not
every material or item requires you to go through the process of how to clean
Cricut mat.
●Alcohol-free baby or wet wipes
●Plastic Cricut scraper tool
●Dawn dish soap
●Lint roller
●LA’s amazing cleaning spray
●Regular dish brush, cloth, or
sponge
Tips & Tricks you need to know to get the best result
When a crafter buys
a Cricut mat, they want it to last longer. But, for several reasons, they do
not use the mat as long as they think. If you want to know how to clean Cricut
mat and utilize it for a longer time, read the complete blog. Here are a few
tips & tricks to keep the mat clean:
Always Air Dry
Don’t be tempted,
and use only the air dry process. Because if you dry the Cricut mat with the
help of a towel, it makes the mat sticky with lint and dirty again.
Store Properly
Sometimes after
using the Cricut mat, many users place it under the table and anywhere in their
home. Because of this, the mat gains tons of dust, hair, and debris. That’s why
you have to place the mat under its protective folders or covers.
Use the Proper Cleaning Method by Color
You have to be very
careful while cleaning the Cricut mat. You don’t use the wrong cleaning
methods, such as you do not use the method of soap and water on the pink Cricut
mats.
Scrape Regularly
You need to scrape
off extra debris and residual after every single use of the mat. Doing it makes
the Cricut mat and projects up to scratch.
Don’t Touch the Mats
Sometimes, touching
the Cricut mat is necessary, but you must avoid putting your hands all over it.
Because touching the mat frequently makes them dirty, that is not good for the
Cricut mat and the projects you create.
How To Clean Cricut Mat Through Various Methods?
There are various
types of methods for cleaning the Cricut mat. But it is essential to choose the
right cleaning method for your mat. In this section, you will learn various
cleaning methods. Let's start to talk about the cleaning method:
#1 How To Clean a Cricut Mat [Felt Off]
The felt material
is one of the most challenging things to clean off from the Cricut mat. You
must first use the green or pink StandardGrip mat to clean this. Then adjust it
aside for the felt project. After finishing the task, you can simply peel them
off.
#2 How To Clean Cricut Mats [Baby Wipes]
You can utilize
baby wipes to make tasks without damaging adhesive. Use alcohol-free baby wipes
to get the best results. You just need to wipe in a circular motion to clean
the Cricut mat. Rotate gently in a circular motion with gentle pressure, and
not scratch the adhesive off.
#3 How To Clean a Cricut Mat [Awesome Spray]
First of all, spray all over the mat with cleaning spray.
And wait at least 5 - 10 minutes.
Now, take a scraper or squeegee to residue off the area of the
Cricut mat with light pressure.
Clan the mat with the help of warm water and hang vertically or
lay flat to dry.
#4 How To Clean Cricut Mats [Warm Water and Soap]
Initially, take the Cricut Scraper tool to remove the extra dust
and dirt.
Now, put the mat on a flat surface.
Get a soft dish brush, dishcloth, or sponge.
Clean the mat surface in a circular motion using regular dish soap
and warm water.
At last, let them dry.
#5 How To Clean Cricut Mats [LA’s Totally Awesome Spray]
Initially, you need to spray all over the surface of the Cricut
mat with a cleaning spray.
Wait at least 5 - 10 minutes to dislodge the dirt and debris.
Now, clean the mat's surface with a cloth, wipe, or sponge by
applying light pressure.
Clean the mat with warm water.
At last, let them dry.
How to keep the Cricut Mats Clean?
Here are a few
basic and easy steps that you need to follow to keep the Cricut mats clean:
Clean the Cricut mats frequently after using them with a lint
roller or scraper.
You need to replace every time the plastic protector sheet.
Use the right material for the right mat.
How to make your Cricut mat sticky again?
Mentioned steps are
very easy to make your Cricut mat sticky again:
Initially, follow any method given above to clean the mat.
And then, wait until it dries.
Now, cover the mat’s edges with tape.
Apply the new adhesive by following the instruction given upon the
material.
Wait while the adhesive dries.
FAQs
Can you wash Cricut mats?
Yes, you can clean
the Cricut mats with warm water and dish soap. But you have to follow all the
instructions for cleaning mats. If you want to know, read the content above and
get complete knowledge and the process of cleaning mats.
How do you clean Cricut mat?
There are various
types of methods that you need to follow to clean the Cricut mat. Here are some
of them that you have to follow steps by steps mentioned above in the blog:
Clean a Cricut Mat [Felt Off]
Clean Cricut Mats [Baby Wipes]
Clean a Cricut Mat [Awesome Spray]
Clean Cricut Mats [Warm Water and Soap]
Clean Cricut Mats [LA’s Totally Awesome Spray]
How to clean a Cricut cutting mat?
You must follow
some important tips and tricks while making the sticker on the Cricut machine.
If you want to know, read the above blog to learn all tips and tricks.
Cricut machine does a superb job of cutting materials like leather, balsa wood, vinyl, matboard, and chipboard. It can cut materials into the design and give a new shape to the materials. Creating crafts with the Cricut machine is quite easy. Set up your Cricut machine right now by reaching cricut.com/setup.
If this is your first time trying to cut vinyl and you want to know everything about Cricut Vinyl, then you have reached the right place. And being completely honest, Cricut Vinyl is a great material to use for elevating any craft project. Although it is quite easy to deal with, cutting any vinyl material with your Cricut machine can be a bit complicated in case you are a beginner.
This article will give you a complete guide with in-depth knowledge of Cricut Vinyl. In the later sections, you will learn what all types of Cricut vinyl are in the craft world. After which, it will be easy for you to understand which Cricut Vinyl meets your requirements. Cricut machines are flawless crafting tools for all kinds of projects, be it t-shirt making, home decor, or creating personalized gifts.
This is the only guide you will need for Cricut Vinyl because you can learn how actually to use them with your machine for any craft project and keep getting beautiful results every time. So, keep reading to find out everything about Cricut Vinyl and much more.
What Is Cricut Vinyl?
Cricut Vinyl is craft vinyl which is a flexible and versatile crafting material that you can use to make a wide variety of craft projects, including stickers, decorated mugs, tumblers, and craft decals. Even though vinyl is very flexible and sometimes difficult to work with, you can still cut it with your hands. But you can use the Cricut cutting machines for finer, more precise, intricate design cuts.
The Cricut vinyl can easily create removable decals, labels, customized home decors, custom gifts, personalized kitchen containers, and much more. The Cricut vinyl comes in so many colors, and you get tonnes of options for creating any project you can think of.
What Are The Types Of Cricut Vinyl?
The various types of Cricut Vinyl that you can find in the market are:
Removable Adhesive Vinyl
Removable adhesive Cricut vinyl comes under the category of adhesive vinyls that are used for crafting. These Cricut vinyls are applied to projects like the stickers as they come with an adhesive backing. This backing bonds to the surface of your base material when you apply pressure over the sticker, and no heat is needed in this. Like every adhesive vinyl, this is also made up of two different layers. The top layer is the Cricut vinyl itself and the second layer, which is beneath it, is of a paper liner. The Cricut vinyl layer has an adhesive backing, whereas the paper liner protects it until you are ready to apply it to your craft project. This removable adhesive vinyl comes in many different varieties of finishes and colors.
You can find matte, glossy, glitter, holographic vinyl, and many more. The level of the stickiness of the removable adhesive vinyl is temporary, and it can be easily removed from the base material without leaving any residue. So, if you are creating wall decals, seasonal decors, or temporary projects, this can be a great choice.
Cricut is a brilliant cutting machine that cuts materials and lets you create decorative crafts. It has sharp blades that can cut materials like cardstock, leather, vinyl, etc., to make the crafts. One can control the Cricut machine via the commands given by the computer. In order to quickly set up your new Cricut machine from scratch, you can reach cricut.com/setup now.
Are you wondering how to make a stencil with Cricut? And where to start. Don’t worry; you have come to the right place. This blog will cover how to make a stencil with Cricut Setup at home. There are several ways to make a stencil with Cricut — more ways to use them. You can use stencils for a professional-level finish to DIY home decor projects, such as painted pillows, tea towels, tote bags, wooden signs, and custom T-shirts.
The secret to replicating designs without starting from scratch is a small tool called a reusable stencil. You can cut out your design once or even cut out a few of your favorites at the same time, and then you can reuse stencils over and over again to create beautiful things for home decorations. This is a must-have for every craft lover — Cricut Guide: How to Make a Stencil with Cricut through step-by-step instructions below.
Which Cricut Machine Is Best To Use For Stencils?
You will be happy to know that all Cricut machines available in the market can cut stencil materials.
The Cricut Explore Series and Cricut Maker can cut all stencils, including stencil vinyl, mylar sheets, and freezer paper. With a standard-sized mat, you can make stencils 11.5″ wide and 11.5″ tall. Or, use a larger mat to make a stencil that is 11.5″ wide and 23.5″ tall.
The Cricut Joy can easily cut stencil vinyl, removable vinyl, and freezer paper. Cricut Joy can also cut simple designs from stencil film sheets, but you may need to make several passes. You can cut the stencil to 4.5″ wide and 6.5″ long with a standard size mat.
Cricut Guide: How To Make a Stencil with Cricut
In order to make a stencil with Cricut, kindly follow the steps given below:
Step 1: Stencil Design at the Cricut Design Space
First, you have to select the image you want to stencil. Choose a design from the Cricut Access library, upload a stencil SVG file, or create your own stencil design in the Cricut Design Space.
Find Cricut Access
You can search images at Cricut Access for stencil projects. To find good stencil images, search “stencil” or “pattern.” For this project, we will use a free image called “Lattice Pattern Overlay” from the “Edge to Edge” image set. We repeated the images and stitched them together to make one larger design.
Stencil Design
Upload your own Picture
You can even upload your own stencil image to Design Space.
Design a Stencil in the Design Space
Another option is that you can design your own stencil image in the Cricut Design Space. You can create a stencil of a monogram, a few letters, a short quote, an illustration, or any mix of those elements.
If you want to reapply and reuse a stencil, remember to keep all parts of the stencil image connected. All the design parts must touch if you cut the stencil as one solid piece.
Design Space
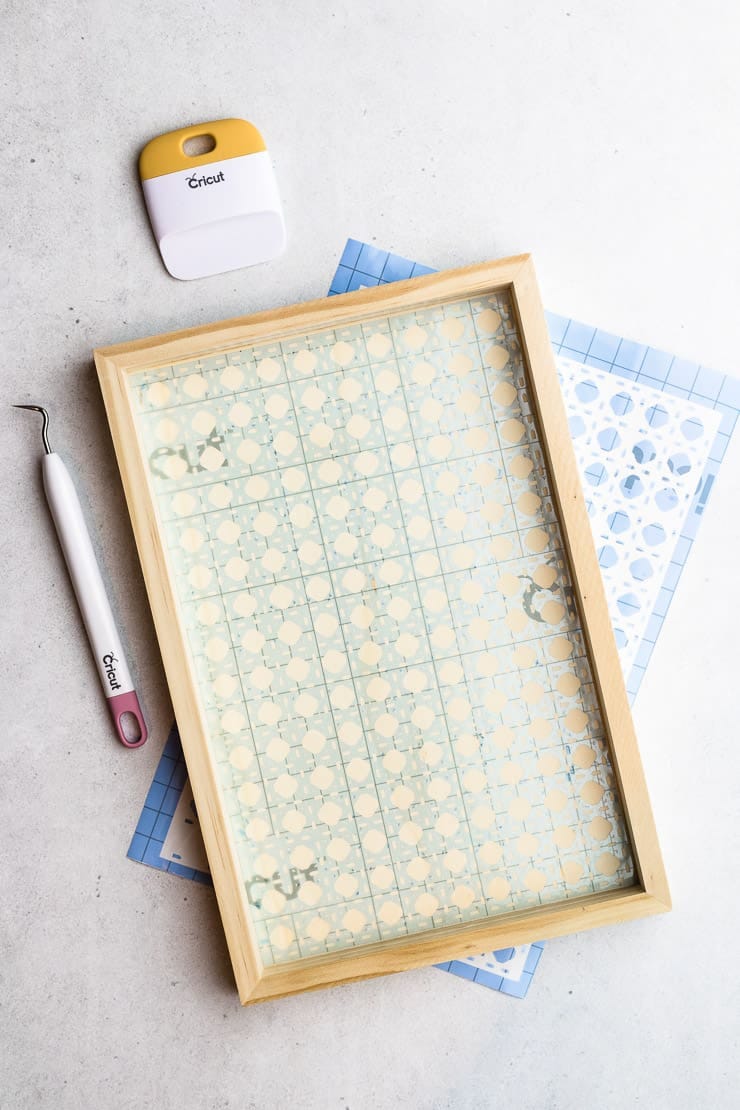
Step 2: Cut Stencil Vinyl
Once you have completed the stencil design, you can prepare to cut the stencil vinyl.
cricut stencil vinyl 2
First, put the stencil vinyl on a LightGrip or StandardGrip (Cricut cutting mat.) We suggest you roll your stencil vinyl with a Brayer tool to ensure it’s flat, smooth, and attached well to the mat.
Next, click the button to load the mat into your Cricut machine.
Afterward, go back to the Design Space, and send your file to the machine. Here’s how to do it:
First, tap on the green “Make it” on the upper right side.
On your next Prepare screen, check that your design looks correct. If so, tap Continue.
On your next Make screen, tap Browse All Materials and select Stencil Vinyl.
Note: If you’ve a Cricut Explore Air, change the Smart Dial to Custom to access the Browse All Materials menu.
Then, you’re ready to cut out your design. Keep in mind to check the fine-point blade is loaded into your machine, and tap the Go button to cut out your design.
When you’ve completed cutting, take off the mat. Now it’s time to move your design.
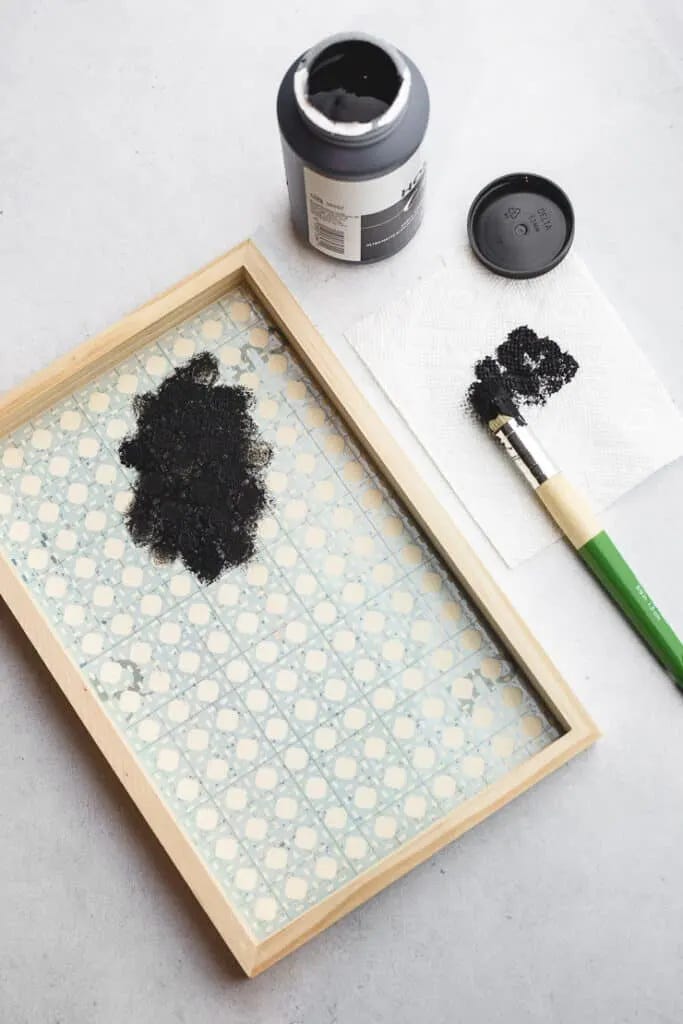
Step 3: Apply Stencil Vinyl
Ready to apply stencil vinyl to the surface of your project? Here’s how:
First, ensure your project surface is dry and clean. Then, put your stencil vinyl on the project surface. Take your time to apply it exactly as you want the final image to appear.
Use the Cricut Setup scraper tool or old gift card to burn the stencil vinyl onto the project surface. Start burning in the center, then move to the picture’s edges. Burning the edges creates a good seal and stops your paint from bleeding under the edges. Since stencil vinyl is transparent, you’ll be able to see where it’s making good contact, where bubbles may occur, or where you need to burn more.
If you’re using transfer tape, you follow the same burning steps. After burning, carefully peel off the transfer tape at a 45-degree angle, leaving the stencil vinyl on your project surface.
cricut stencil vinyl 4
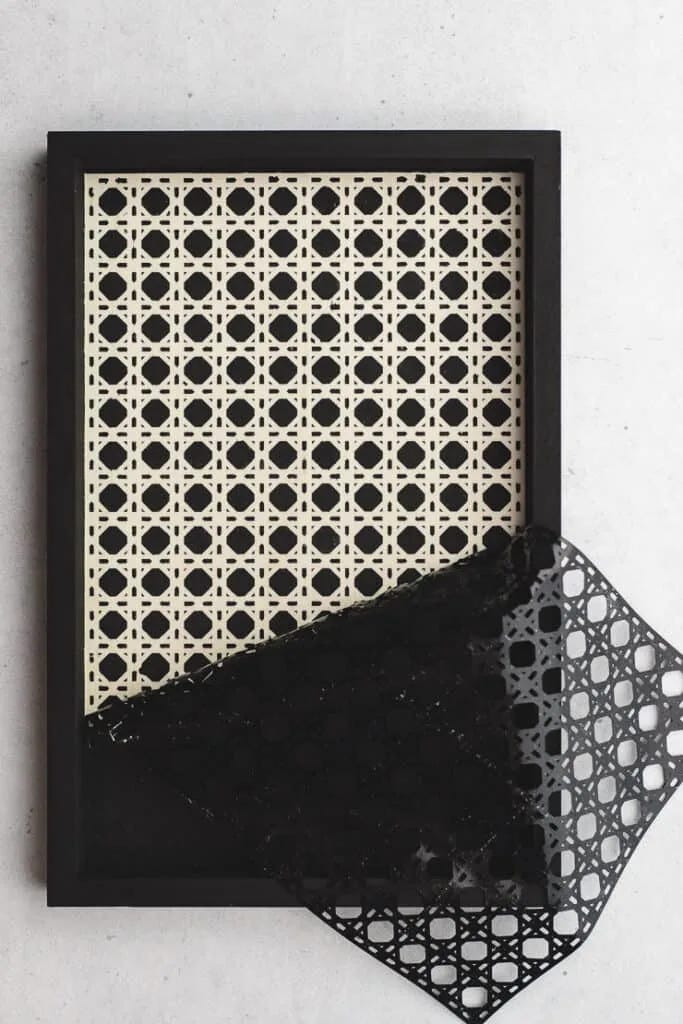
Step 4: Paint your Stencil Vinyl
You’ve the stencil vinyl applied; now it is time to paint your design.
Use a paintbrush (stencil brush) to apply a light coat of paint over the stencil vinyl. The paint will pass through the cut areas of your stencil vinyl, moving the design to your project surface.
You can apply more thin coats of paint as needed for more coverage. Remember it is better to apply 3-thin coats than a 1-thick coat to stop the paint from bleeding.
After the paint is dry, carefully remove your stencil vinyl. You can now transfer your stencil vinyl to a new area and reuse it.
If your stencil stretches or tears while removing, you can use the Cricut machine to cut another stencil vinyl.
Cricut stencil vinyl 5
So, the above instructions are the complete process of how to make a stencil with Cricut at home.